
RSS
Showing posts with label Internet Tricks. Show all posts

How to Download complete Website and save it on PC

When you discover an interesting website and want to copy a complete website to view it locally without internet connection. If in hurry, you can backup entire website on USB drive and view it afterward. Can be useful even if you want to save thousands of images from a webpage in one click.

HTTrack is a tool to save all the webpages from a specified website. The website downloaded when viewed offline looks exactly as it appears online. An exact mirror of the website is downloaded on your HardDisk with all the styles, background images and alignments keeping intact. The links pointing out of the page are also taken into consideration means those pages are also downloaded. For example: You have to download all the MP3 songs, Flash, videos or only some of them using Filters from a website all at once then WinHTTrack is a feasible option.

The sites downloaded can be used in your regular browser and there are no waiting times to load another page as all the pages are already stored offline in your Local Disk. Moreover, no active Internet connection required to access it. Personally, I used it to show  research pages of my Project to the concerned professor where internet connectivity was poor.

How to download complete website?

Enter Project name and Category (It can be anything according to the site you are downloading). Next the Base Path where the site will be downloaded.


More than one URL can be entered to be downloaded. Specify them in the box. You can specify filters to download specific extension of files like MP3, JPG or PNG from Set Options buttons.
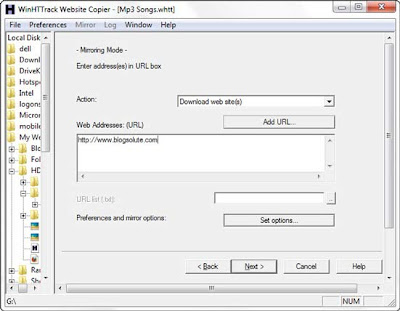


Then Press Finish to start copying. You can prefer to shutdown PC after downloading is completed  as it may take few minutes depending upon the size of files hosted on site.


Now, to view the downloaded website go to the output folder and click on index.html file (general name) or open the HTTrack Website copier program and click Browse Sites from File menu.
Click Here to Download HTTrack

read comments Read User's Comments

Facebook Album Downloader FacePAD

How to download facebook photo album

There is a software called FacePAD, better known as the Facebook Photo Album Downloader will allow you to download your friends’ entire Facebook albums with a click of a button.Instead of downloading images on a photo album manually, it is better to use free facebook photo album downloader. All you need is a Mozilla firefox browser + FacePAD add-on. By using facePAD you are able to download all images in your friend’s facebook albums, events albums and group albums.


SETUP/PREFERENCES
1) Make sure that THIRD PARTY COOKIES are ENABLED.
2) Make sure your DEFAULT DOWNLOAD DIRECTORY is set in Firefox’s OPTIONS/PREFERENCES.

DOWNLOADS ALBUMS
To download photos from the a friend’s album, right-click (with your mouse) on the name/link of a facebook album and click the DOWNLOAD ALBUM WITH FACEPAD option. The photos will be downloaded to Firefox’s default download directory.

DOWNLOAD Facebook Album Downloader FROM BELOW LINK

https://addons.mozilla.org/en-US/firefox/addon/8442/

read comments Read User's Comments

How to use Facebook Smileys emoticons in Facebook Chat

How to use Bold Underlined Fonts and emoticons Smileys in Facebook Chat

Facebook is one of  the most popular social networking site the world.There are many smiley in face book chat conversation message to be used.Here is the list of   some popular smiley codes to use in facebook chat.check out this image and their code just write the symbol you will get the smiley.


There are may tricks in facebook chat.Very few people know that you can use even bold fonts or underlined fonts in facebook chat. To use bold fonts type your message between two asterisks.

e.g. *message*

To type underlined messages type your message between two underscores.

e.g. _message_

If you know some more please share it here

enjoy…


read comments Read User's Comments

Get Facebook Email Address – Invitation to Messages

How to Get Facebook Email Address

Facebook has just new features in which it will give email addresses to users ,at this time facebook email id is not open to everyone ,you have to request invittation.In order to get a invite to this new service you need to visit following  link where in you would be asked to click on the ‘Request Invite’ button.


http://www.facebook.com/about/messages/


if you are lucky you will get the yourname@facebook.com email id as soon as possible .Please note that Your email address will match your public username, for example:

Profile: facebook.com/username

Then your email address will be

Email: username@facebook.com

If you don’t have a username you can go here facebook.com/username/ to get or click below

http://www.facebook.com/username/

read comments Read User's Comments

Running Multiple Instances of Google Talk

Users of Google Talk (GTalk) can also let GTalk go to polygamy, that’s running multiple instances of Google Talk and login to multiple Google accounts on Google Talk. The polygamy trick can be done without any crack, patch or hack, with just a simple command line parameter or switch /nomutex appended to the Google Talk shortcut.

Ability to polygamy running multiple Google Talk is useful if users have multiple Google Talk accounts (or Google or Gmail accounts that used to login to GTalk) or multiple profiles or personalities, and don’t want to log on and off from one account to another account every time when want to switch, or want to log in to all accounts at the same time on the same computer.

You can add the /nomutex switch or parameter to existing Google Talk shortcut, or create a new shortcut with the /nomutex command line parameter.

To edit existing Google Talk shortcut:

1) Right click on the Google Talk shortcut.
2) On the right click contextual menu, click on Properties.
3) Go to Shortcut tab on Google Talk Properties window.
4) On the Target textbox, add in the /nomutex to the end of the line so that it looks like below (or you can simply copy and paste the below syntax and replace the original).

Target: "C:\Program Files\Google\Google Talk\googletalk.exe" /nomutex

5) Click on OK.


To create a new shortcut for Google Talk:

1) Right-click on the desktop or anywhere you want to place the GTalk shortcut.
2) Select New on the right click context menu.
3) Then select Shortcut.
4) Copy and paste the following line to the text box when prompted to type the location of the item:

“C:\Program Files\Google\Google Talk\googletalk.exe” /nomutex

5) Click on Next.
6) Give the shortcut a proper name such as Google Talk or Google Talk Multiple or Google Talk Polygamy.
7) Click OK until you are done.

If you have hex editor, you can act like a hacker and modify the bits in Google Talk program so that it will always allow multiple instances of GTalk to be launched whether the /nomutex switch is specified or not.

Launch hex editor and open googletalk.exe, then search for the following patterns in the hex editor:

004536FD . 3BC6 CMP EAX,ESI
004536FF . 75 05 JNZ SHORT googleta.00453706

Modify the string to look like the following:

004536FD . 8BC1 MOV EAX,ECX
004536FF . EB 05 JMP SHORT googleta.00453706


How this Works?
The mutex is short for mutual exclusion object.
A mutex is a program object that allows multiple program threads to share the same resource, but not simultaneously.

So, in the hack above, we used nomutex (no-mutex) to use the same resources simultaneously....!

read comments Read User's Comments

Creating IM Bot

This quick tutorial will show you how to develop your own functional IM bot that works with Google Talk, Yahoo! Messenger, Windows Live and all other popular instant messaging clients.
To get started, all you need to know are some very basic programming skills (any language would do) and web space to host your “bot”.

For this example, I have created a dummy bot called “insecure” that listens to your IM messages. To see this live, add insecure@bot.im to your GTalk buddy list and start chatting.


If you like to write a personal IM bot, just follow these simple steps:-

Step 1: Go to www.imified.com and register a new account with a bot.

Step 2: Now it’s time to create a bot which is actually a simple script that resides on your public web server.
It could be in PHP, Perl, Python or any other language.

Example Hello World bot:
The example below illustrates just how easy it is to create a bot.
This example is coded in PHP.

<?php
switch ($_REQUEST['step']) {
case 1:
echo "Hi, what's your name?";
break;
case 2:
echo "Hi " . $_REQUEST['value1'] . ", where do you live?";
break;
case 3:
echo "Well, welcome to this hello world bot, " . $_REQUEST['value1'] . "<br>from " . $_REQUEST['value2'] . ".<reset>";
break;
}

?>

Step 3: Once your script is ready, put it somewhere on your web server and copy the full URL to the clipboard.

Step 4: Now login to your imified account, paste the script URL

Screen Name: insecure@bot.im
Bot Script URL: http://url//
 
Step 5: Add that im bot your friends list. That’s it.

This is a very basic bot but the possibilities are endless.

For instance, you could write a bot that will send an email to all your close friends via a simple IM message. Or you could write one that will does currency conversion.

read comments Read User's Comments

Running Multiple Instances of Yahoo Messenger

If you are using Yahoo! Messenger v8.0 or above, YahooMulti.reg will let you run multiple copies of Yahoo Messenger.
At the same time which will allow you to login multiple ID’s at the same time.

1) Open Registry Editor (regedit.exe)
Click Start > Run and then type 'regedit' press enter.

2) Then Look For-
HKEY_CURRENT_ USER\Software\yahoo\ pager\Test.

3) Then change this value of plural to like this-
“Plural”=dword: 00000001

read comments Read User's Comments

Increase Broadband Speed Using Simple Tweak

A Simple Tweak (XP Pro only) which will increase your Broadband Speed.

Make sure you Log on as Administrator, not as a user with Administrator privileges.

Follow the steps as given below-

1) Click on Start Button.

2) Select Run From Start Menu.

3) Type gpedit.msc

4) Expand the [Administrative Templates] branch.

5) Then Expand the [Network] branch.

6) Highlight(Select by Single Click) [QoS Packet Scheduler]

7) Double-click [Limit Reservable Bandwidth] (Available in Right Side Panel)

8) Check(Select By Single Click on it) [Enabled]

9) Change [Bandwidth limit %] to 0 %

10) Click [OK] Button.

11) Restart Your PC.

12) Now Check Your Broadband Speed.

read comments Read User's Comments